> ## Documentation Index
> Fetch the complete documentation index at: https://docs.adaptive-ml.com/llms.txt
> Use this file to discover all available pages before exploring further.
# Launch a recipe
> Launch a custom recipe, from Adaptive UI or SDK
## From The Adaptive UI
You can launch a training in the adaptive UI. In the "Trainings" tab, you can hit the "New Training" button and select "Custom Recipe" as the training method. This will lead you to a wizard to launch your recipe based on its content and config.
You have 3 steps:
1. Select the recipe that you want to run
2. Select the values for the config. The Adaptive UI automatically create widgets to input values based on the types of your config fields. (See the image below)
3. Review your custom recipe and launch the job
Config parameters selection in the UI}>
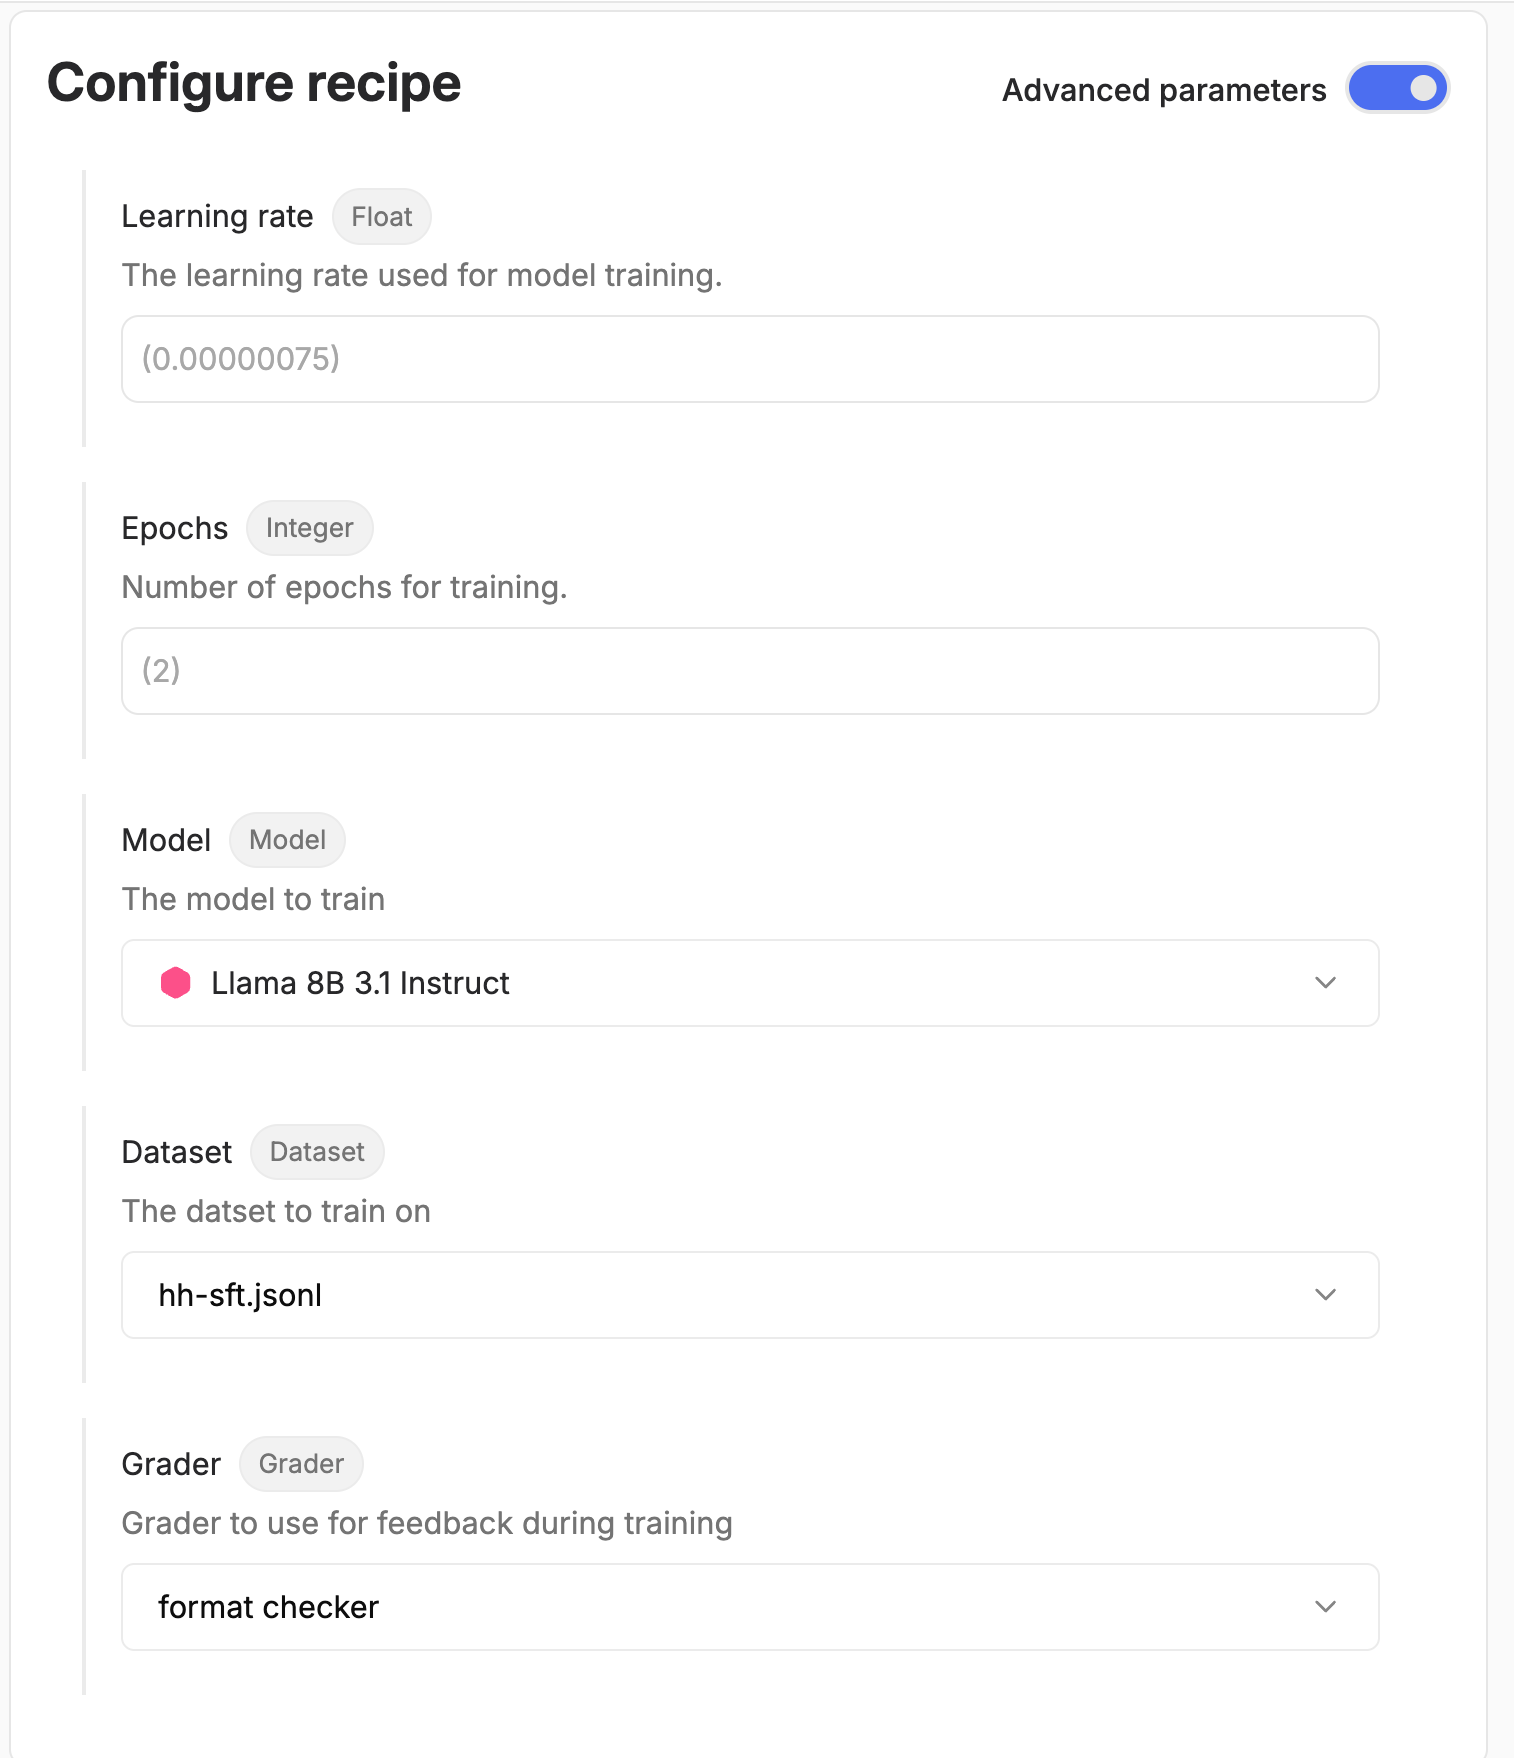 Above is an example of parameter selection in the UI for a config defined in the custom recipe as:
```python custom_recipe.py theme={null}
class MyConfig(InputConfig):
# Training parameters
learning_rate: float = 0.001
batch_size: int = 32
epochs: int = 10
# Model parameters
model_name: AdaptiveModel
max_length: int = 2048
```
## From the SDK
The Adaptive SDK provides a comprehensive interface for managing custom recipes. You can upload your recipe files, list existing recipes, and launch training jobs programmatically.
First, initialize the Adaptive SDK client:
```python theme={null}
from adaptive_sdk import Adaptive
# Initialize client
client = Adaptive(
base_url="[ADAPTIVE_URL]",
api_key="[ADAPTIVE_API_KEY]"
)
# Set default use case (optional)
client.set_default_use_case("my-use-case")
```
### Uploading Custom Recipes
Use `adaptive.custom_recipes.upload()` to upload your recipe files to the platform.
```python theme={null}
# Upload a recipe file
recipe_data = client.custom_recipes.upload(
file_path="/path/to/your/recipe.py",
custom_script_key="my-recipe",
name="PPO Training Recipe"
)
print(f"Uploaded recipe with ID: {recipe_data.id}")
```
### Listing Recipes
Use `adaptive.custom_recipes.list()` to view all available recipes.
To list all recipes:
```python theme={null}
# List all recipes in the default use case
recipes = client.custom_recipes.list()
for recipe in recipes:
print(f"Recipe: {recipe.name} (Key: {recipe.key})")
```
To list all recipes of a specific use-case:
```python theme={null}
# List recipes in a specific use case
recipes = client.custom_recipes.list(use_case="production")
for recipe in recipes:
print(f"Recipe: {recipe.name} (Key: {recipe.key})")
```
### Launching Training Jobs
Use `adaptive.custom_recipes.run_training_recipe()` to launch training jobs with your uploaded recipes.
Arguments to pass to the recipe config should be given in the `recipe_args` argument and should perfectly match the config defined in the recipe.
```python theme={null}
# Launch training with a dataset
job = client.custom_recipes.run_training_recipe(
model="llama-3.1-8b-instruct",
recipe_key="ppo-training-recipe",
output_name="ppo-trained-model",
recipe_args = {
"lr": 0.02,
"batch_size": 8
}
)
```
Above is an example of parameter selection in the UI for a config defined in the custom recipe as:
```python custom_recipe.py theme={null}
class MyConfig(InputConfig):
# Training parameters
learning_rate: float = 0.001
batch_size: int = 32
epochs: int = 10
# Model parameters
model_name: AdaptiveModel
max_length: int = 2048
```
## From the SDK
The Adaptive SDK provides a comprehensive interface for managing custom recipes. You can upload your recipe files, list existing recipes, and launch training jobs programmatically.
First, initialize the Adaptive SDK client:
```python theme={null}
from adaptive_sdk import Adaptive
# Initialize client
client = Adaptive(
base_url="[ADAPTIVE_URL]",
api_key="[ADAPTIVE_API_KEY]"
)
# Set default use case (optional)
client.set_default_use_case("my-use-case")
```
### Uploading Custom Recipes
Use `adaptive.custom_recipes.upload()` to upload your recipe files to the platform.
```python theme={null}
# Upload a recipe file
recipe_data = client.custom_recipes.upload(
file_path="/path/to/your/recipe.py",
custom_script_key="my-recipe",
name="PPO Training Recipe"
)
print(f"Uploaded recipe with ID: {recipe_data.id}")
```
### Listing Recipes
Use `adaptive.custom_recipes.list()` to view all available recipes.
To list all recipes:
```python theme={null}
# List all recipes in the default use case
recipes = client.custom_recipes.list()
for recipe in recipes:
print(f"Recipe: {recipe.name} (Key: {recipe.key})")
```
To list all recipes of a specific use-case:
```python theme={null}
# List recipes in a specific use case
recipes = client.custom_recipes.list(use_case="production")
for recipe in recipes:
print(f"Recipe: {recipe.name} (Key: {recipe.key})")
```
### Launching Training Jobs
Use `adaptive.custom_recipes.run_training_recipe()` to launch training jobs with your uploaded recipes.
Arguments to pass to the recipe config should be given in the `recipe_args` argument and should perfectly match the config defined in the recipe.
```python theme={null}
# Launch training with a dataset
job = client.custom_recipes.run_training_recipe(
model="llama-3.1-8b-instruct",
recipe_key="ppo-training-recipe",
output_name="ppo-trained-model",
recipe_args = {
"lr": 0.02,
"batch_size": 8
}
)
```