> ## Documentation Index
> Fetch the complete documentation index at: https://docs.adaptive-ml.com/llms.txt
> Use this file to discover all available pages before exploring further.
# Input configuration
> Create a self-documented recipe config to parametrize your recipe's inputs
Recipe input configurations allow you to define the input interface to your recipes in Python code, and have it automatically transformed it into UI components, through which you can then launch the recipe in no-code style. This presents a number of benefits:
* flexibility: run the same recipe with different parameters without modifying the code
* reusability: recipes can be parametrized in such a way that they can be used for different use cases all together (good examples of this are the generic prebuilt recipes, which support any dataset or use case)
* self-documenting: if you write an input config class once, your recipe and all of its input parameters are automatically documented, both for business and technical users, in code and in the UI.
### Basic Configuration Structure
Every recipe configuration inherits from a magic class `InputConfig` and defines the parameters your recipe expects in the same way as [Pydantic models](https://docs.pydantic.dev/latest/concepts/models/). Only the configuration classes that inherit from `InputConfig` in your code get automatically transformed into UI widgets.
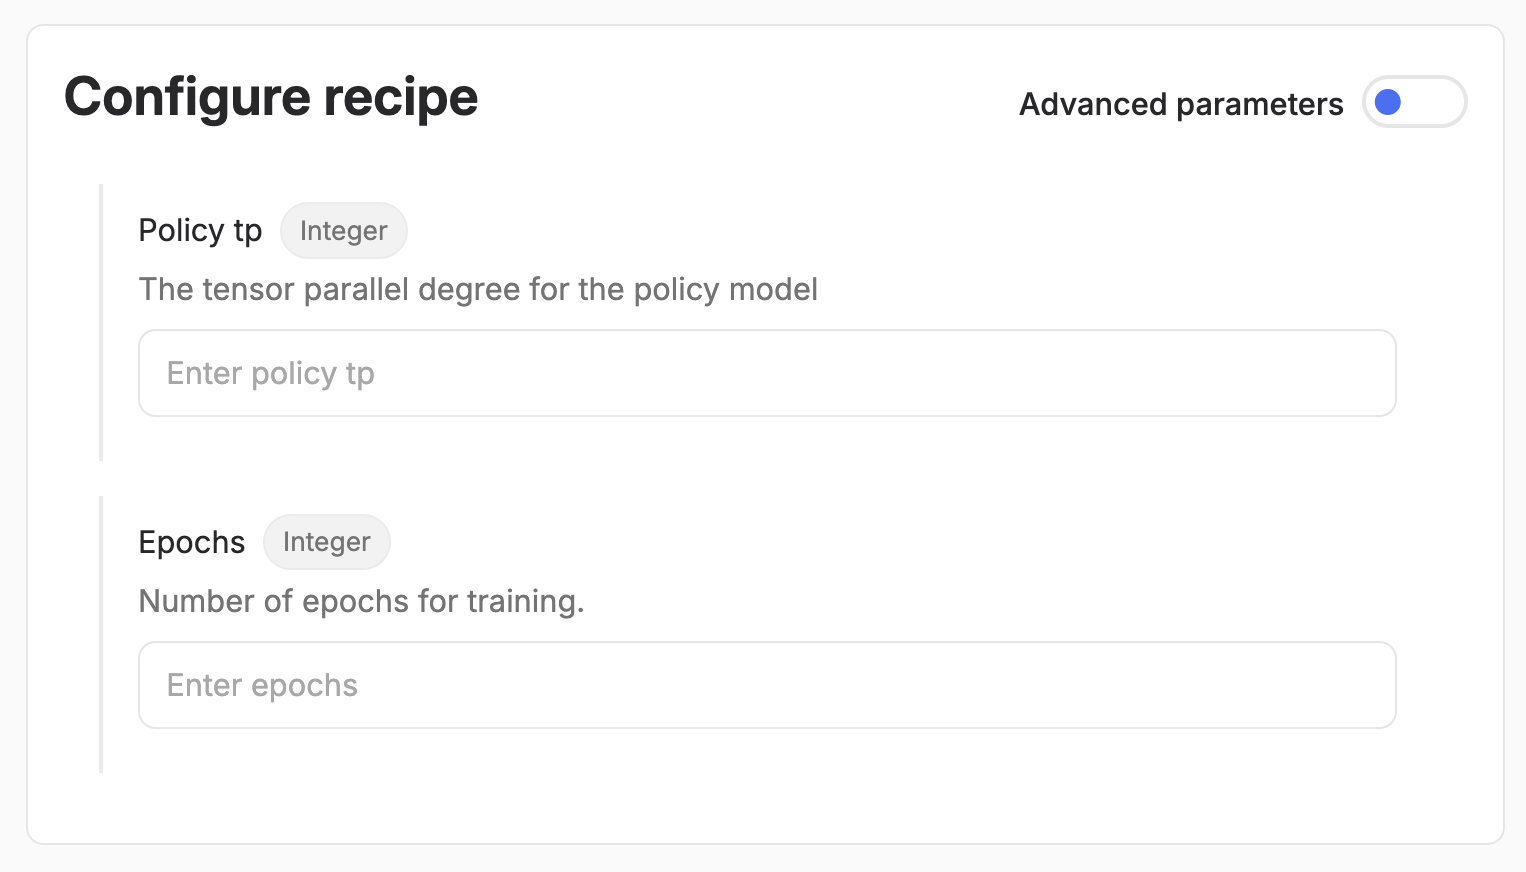
Above is an example of parameter selection in the UI for a config defined in the custom recipe as. You can set the description, title and default value for the resulting widget by using `typing.Annotated` and `pydantic.Field` as shown below.
When users run your recipe, by default they will only be forced to input the values for which you have not set defaults. This allows you to simplify the input interface to your recipe as much as possible, leaving the user only with the mandatory decision to be made, while also enabling the flexibility to change fine-grained parameters if needed.
```python theme={null}
from typing import Annotated
from pydantic import Field
class MyConfig(InputConfig):
# Training parameters
learning_rate: Annotated[
float,
Field(
description="The learning rate used for model training.",
title="Learning Rate",
default=7.5e-7,
)
] = 7.5e-7
policy_tp: Annotated[
int,
Field(
description="The tensor parallel degree for the policy model"
)
]
epochs: Annotated[
int,
Field(
description="Number of epochs for training.",
title="Epochs"
)
]
```
Config parameters selection in the UI that map to the config above; the default learning_rate parameter is hidden, unless "Advanced parameters" is toggled.}>
 ### Using Your Configuration
Once you've defined your configuration class, you can pass it to your `@recipe_main` method (the input configuration must be the first parameter of the function, before the RecipeContext). When you run your recipe with input parameters, Adaptive Engine will create a typed and validated input object, and call `@recipe_main` with an instantiated `MyConfig` class.
```python theme={null}
@recipe_main
async def main(config: MyConfig, ctx: RecipeContext):
# Access configuration values
print(f"Learning Rate: {config.learning_rate}")
print(f"Policy TP: {config.policy_tp}")
# Your recipe logic here
# ...
```
## Supported field types
Type annotations in your config parameters allow Adaptive to validate user input and make sure widgets render correctly according to their type in the UI.
You can use most types and leverage pydantic validation (operators such as `max_value`, `ge` etc.). There are also "magic" Adaptive types you can use in your config, which are platform-aware. This means that, when rendered in the UI, they allow you to select an entity that exists in your deployment as an input parameter - namely models, datasets and graders. If you pass one of these magic input parameters via SDK, it will also be validated for existence within your Adaptive deployment.
Below you will find examples usage of both basic python types and Adaptive magic classes.
### Basic Types
```python theme={null}
from pydantic import Field
from typing import Annotated
class BasicConfig(InputConfig):
### BASIC TYPES ###
# String field with description
string_field: Annotated[str, Field(description="A string field")] = "default value"
# Integer field with validation
integer_field: Annotated[int, Field(description="An integer field", ge=1, le=10)] = 1
# Float field
float_field: Annotated[float, Field(description="A float field")] = 0.001
# Boolean field
boolean_field: Annotated[bool, Field(description="A boolean field")] = True
### COLLECTIONS ###
# List field with validation
list_field: Annotated[List[str], Field(description="A list field", min_length=1, max_length=10)]
# Set field
set_field: Annotated[Set[str], Field(description="A set field")]
# Dictionary field
dict_field: Annotated[Dict[str, str], Field(description="A dict field")]
# Literal enum field
enum_field: Annotated[Literal["sgd", "adam"], Field(description="An enum field")] = "sgd"
```
### Adaptive Types
Adaptive provides special support for model fields, allowing you to pass model instances to your recipes:
```python theme={null}
from adaptive_harmony.runtime import AdaptiveModel, AdaptiveDataset, AdaptiveGrader
class AdaptiveConfig(InputConfig):
### ADAPTIVE TYPES ###
# Model selector
model: Annotated[AdaptiveModel, Field(description="A model field")]
# Dataset selector
dataset: Annotated[AdaptiveDataset, Field(description="A dataset field")]
# Grader selector
grader: Annotated[AdaptiveGrader, Field(description="A grader field")]
```
You can then access the relevant parameters in these objects as runtime with `model.path` (used to spawn the model), `dataset.file` (used to load a dataset file) and `grader.grader` (used to instantiate a grader).
### Nested Configurations
You can create complex configurations by nesting other config classes (currently widgets only support a single level of nestedness):
```python theme={null}
class MySubConfig(InputConfig):
name: Annotated[str, Field()]
value: Annotated[int, Field()]
children: Annotated[List[str], Field()]
optimizer: Annotated[Literal["sgd", "adam"], Field()]
class NestedConfig(InputConfig):
# Single nested config
sub_config: Annotated[MySubConfig, Field()]
# List of nested configs
sub_config_list: Annotated[List[MySubConfig], Field()]
```
### Using Your Configuration
Once you've defined your configuration class, you can pass it to your `@recipe_main` method (the input configuration must be the first parameter of the function, before the RecipeContext). When you run your recipe with input parameters, Adaptive Engine will create a typed and validated input object, and call `@recipe_main` with an instantiated `MyConfig` class.
```python theme={null}
@recipe_main
async def main(config: MyConfig, ctx: RecipeContext):
# Access configuration values
print(f"Learning Rate: {config.learning_rate}")
print(f"Policy TP: {config.policy_tp}")
# Your recipe logic here
# ...
```
## Supported field types
Type annotations in your config parameters allow Adaptive to validate user input and make sure widgets render correctly according to their type in the UI.
You can use most types and leverage pydantic validation (operators such as `max_value`, `ge` etc.). There are also "magic" Adaptive types you can use in your config, which are platform-aware. This means that, when rendered in the UI, they allow you to select an entity that exists in your deployment as an input parameter - namely models, datasets and graders. If you pass one of these magic input parameters via SDK, it will also be validated for existence within your Adaptive deployment.
Below you will find examples usage of both basic python types and Adaptive magic classes.
### Basic Types
```python theme={null}
from pydantic import Field
from typing import Annotated
class BasicConfig(InputConfig):
### BASIC TYPES ###
# String field with description
string_field: Annotated[str, Field(description="A string field")] = "default value"
# Integer field with validation
integer_field: Annotated[int, Field(description="An integer field", ge=1, le=10)] = 1
# Float field
float_field: Annotated[float, Field(description="A float field")] = 0.001
# Boolean field
boolean_field: Annotated[bool, Field(description="A boolean field")] = True
### COLLECTIONS ###
# List field with validation
list_field: Annotated[List[str], Field(description="A list field", min_length=1, max_length=10)]
# Set field
set_field: Annotated[Set[str], Field(description="A set field")]
# Dictionary field
dict_field: Annotated[Dict[str, str], Field(description="A dict field")]
# Literal enum field
enum_field: Annotated[Literal["sgd", "adam"], Field(description="An enum field")] = "sgd"
```
### Adaptive Types
Adaptive provides special support for model fields, allowing you to pass model instances to your recipes:
```python theme={null}
from adaptive_harmony.runtime import AdaptiveModel, AdaptiveDataset, AdaptiveGrader
class AdaptiveConfig(InputConfig):
### ADAPTIVE TYPES ###
# Model selector
model: Annotated[AdaptiveModel, Field(description="A model field")]
# Dataset selector
dataset: Annotated[AdaptiveDataset, Field(description="A dataset field")]
# Grader selector
grader: Annotated[AdaptiveGrader, Field(description="A grader field")]
```
You can then access the relevant parameters in these objects as runtime with `model.path` (used to spawn the model), `dataset.file` (used to load a dataset file) and `grader.grader` (used to instantiate a grader).
### Nested Configurations
You can create complex configurations by nesting other config classes (currently widgets only support a single level of nestedness):
```python theme={null}
class MySubConfig(InputConfig):
name: Annotated[str, Field()]
value: Annotated[int, Field()]
children: Annotated[List[str], Field()]
optimizer: Annotated[Literal["sgd", "adam"], Field()]
class NestedConfig(InputConfig):
# Single nested config
sub_config: Annotated[MySubConfig, Field()]
# List of nested configs
sub_config_list: Annotated[List[MySubConfig], Field()]
```